
How to Prepare Kitchen Appliances for a Move
A well-wrapped appliance can still be difficult to move safely if its cord, blades or detachable parts are left loose. The best way to pack kitchen appliances is to clean, dry and drain them first, then wrap each one individually and secure every loose component. Appliances should be washed and thoroughly dried at least 24 hours before packing.
When planning a kitchen move, the best way to pack kitchen appliances is to prepare each item separately, protect loose or fragile parts and keep accessories with the appliance they belong to. This guide covers practical packing steps, from emptying appliances and securing cords to choosing cushioning and labelling boxes. A little preparation helps keep your kitchen items organised for transport and easier to unpack.
Table of Contents
What Is the Best Way to Have a Kitchen Packed for Moving?
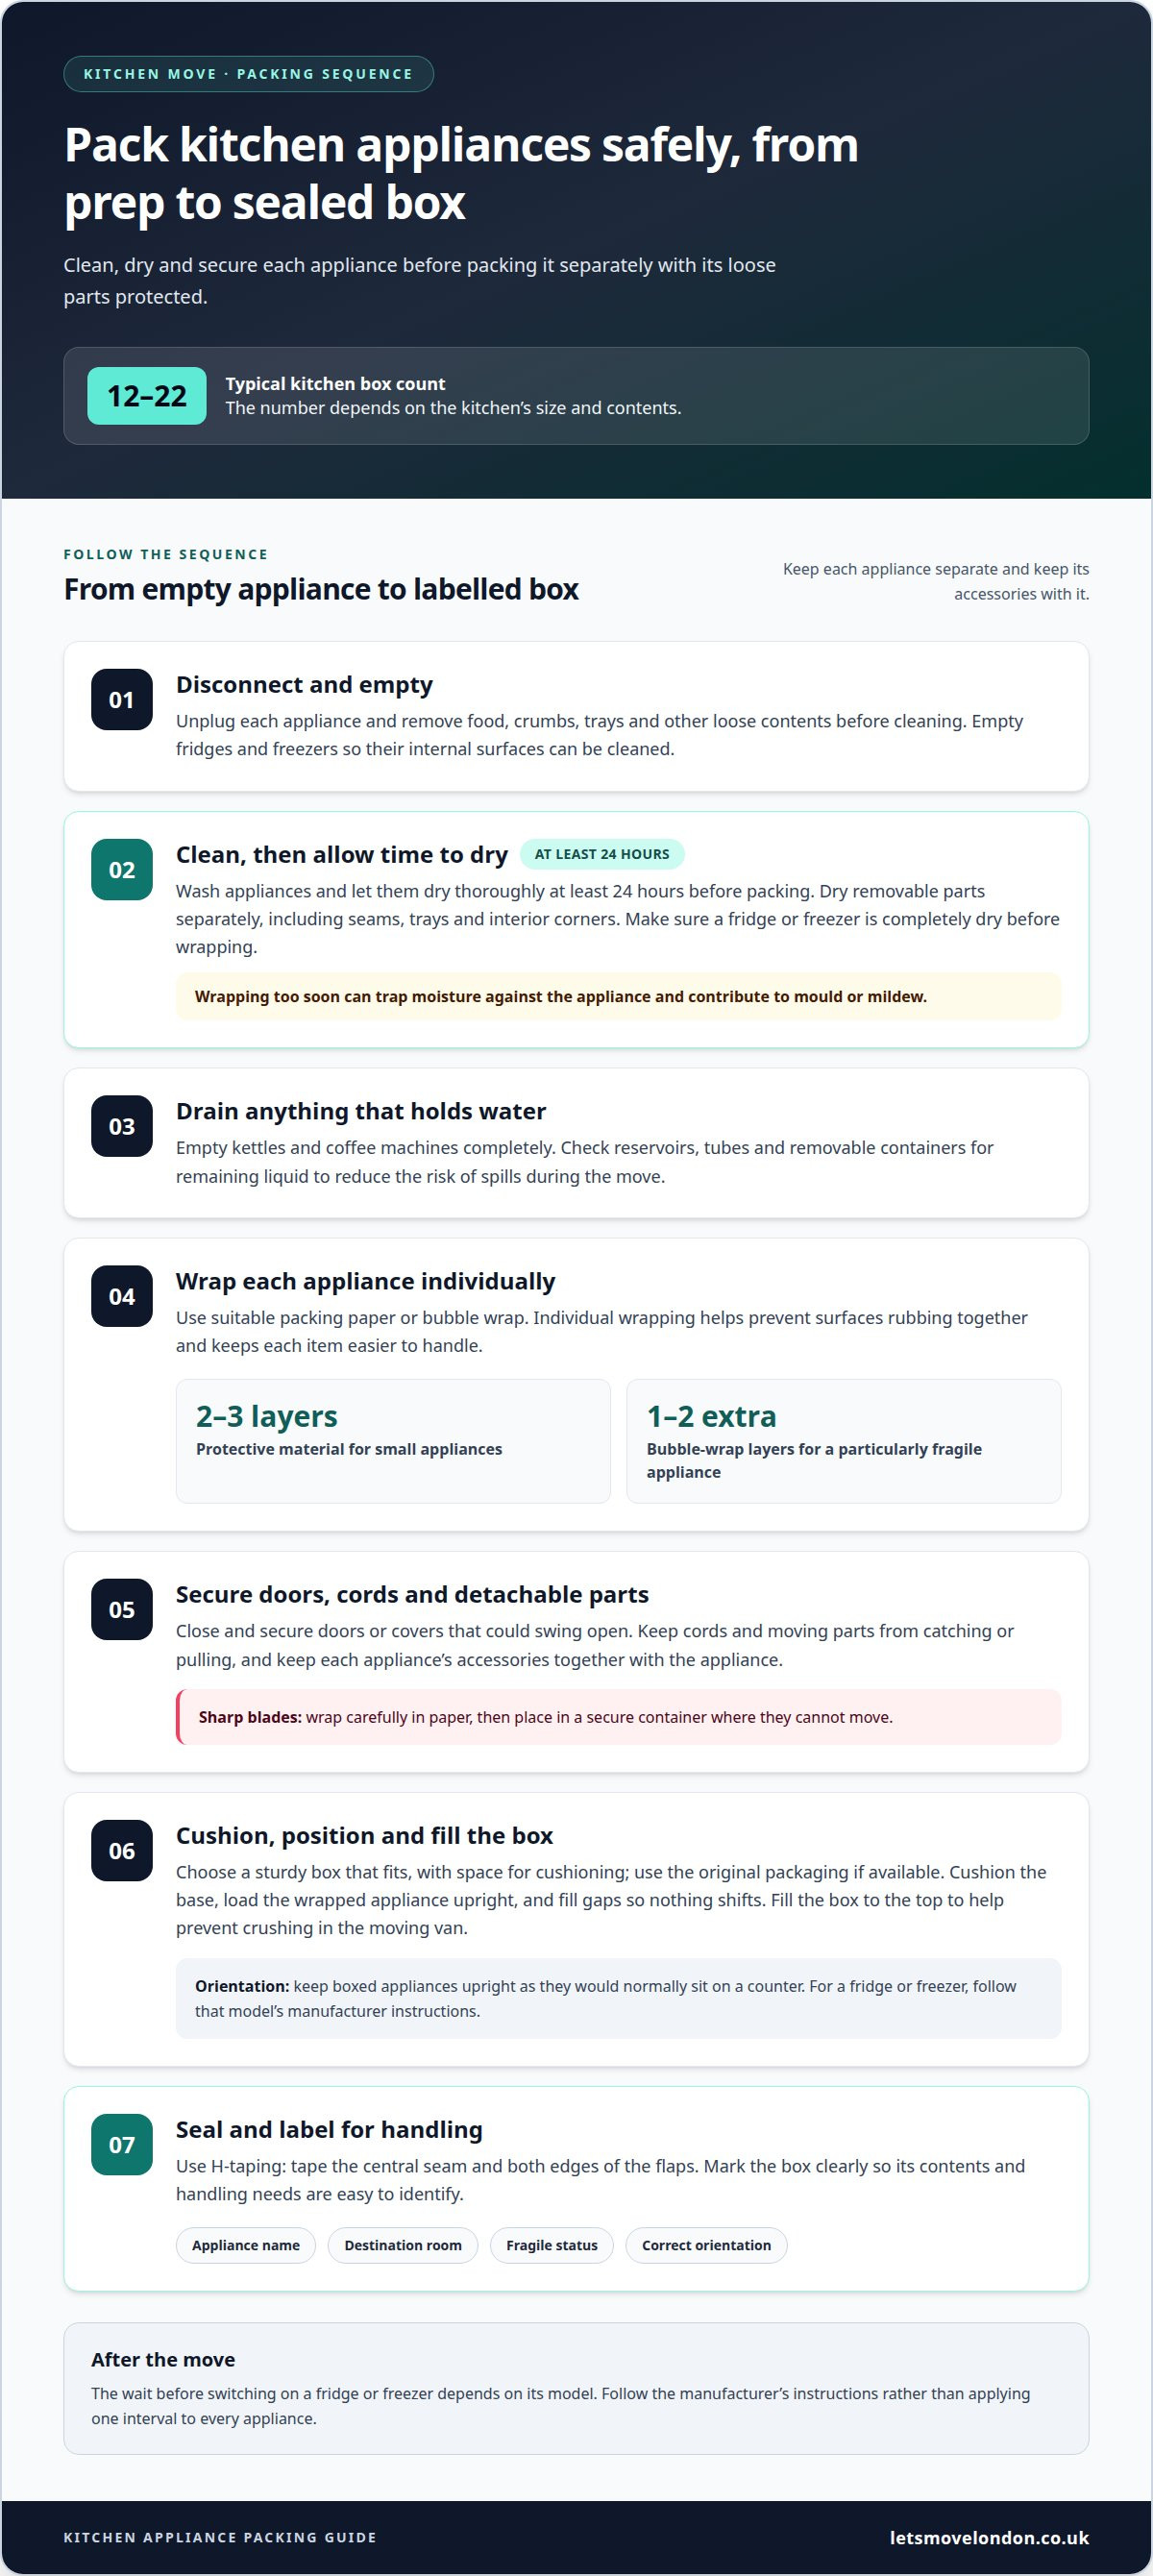
Professional kitchen packing starts with the right boxes, then protects, loads and labels each item for transport. A typical kitchen may need 12 to 22 boxes, depending on its size and contents.
Choosing Boxes and Packing Supplies for Professional Kitchen PackingChoose a sturdy box that fits the appliance, leaving a little space around it for cushioning without making the box awkward to lift. Use the original packaging if you still have it. Pack appliances separately, and choose box sizes that support their contents rather than leaving items loose inside. The number of boxes you need depends on the appliances and other kitchen items you are moving.
How Professionals Prepare the Fridge and FreezerEmpty the fridge and freezer, then have the appliances cleaned and thoroughly dried before packing. Appliances should be washed and dried at least 24 hours before they are packed. A fridge or freezer should be completely dry before it is wrapped, so moisture is not sealed inside. After the move, the time to wait before switching either appliance on depends on its model and manufacturer’s instructions; follow those instructions rather than applying one interval to every appliance.
How Professionals Keep Appliances Upright During TransportPosition each boxed appliance upright, as it would normally sit on a counter, and keep that orientation during loading. This is the recommended position for packed kitchen appliances. Which larger appliance must remain upright depends on its own manufacturer’s instructions, so the packing team should use those instructions for the specific fridge or freezer. Mark the box with its contents and correct orientation to guide handling.
How Professionals Load Boxes and Seal ThemPlace a cushioning layer in the box base, then load the wrapped appliance upright. Pack appliances separately and fill gaps so parts cannot shift. Fill boxes to the top to help prevent crushing in the moving van. Seal each box using H-taping: tape the central seam and both edges of the flaps. Label it with the appliance name, destination room, fragile status and correct orientation.
How Professionals Clean, Dry and Drain Appliances
Professional appliance packing is not automatically cheaper; the price depends on the case and is given after a quote request. Appliance size, quantity and access affect the work, while careful preparation helps reduce handling risks. If appliances are packed wet, trapped moisture can contribute to mould or mildew; packing them while connected can strain cords or plugs.
Unplug and empty each appliance before cleaning. The packing team disconnects appliances and removes food, crumbs and removable trays. For a fridge or freezer, contents must be cleared before internal surfaces can be cleaned. This also prevents loose items from shifting inside during handling.
Clean inside and outside, then allow at least 24 hours to dry. Appliances should be washed and thoroughly dried at least 24 hours before packing. Dry removable parts separately, and pay attention to seams, trays and interior corners where moisture can linger. Wrapping too soon can trap dampness against the appliance.
Drain appliances that hold water completely. Kettles and coffee machines can retain water in reservoirs, tubes or removable containers. Empty each part and check for remaining liquid before packing, reducing the risk of spills onto other belongings during the move.
Keep appliances disconnected and dry through packing. After cleaning and draining, the team checks the plug, cable and appliance body before wrapping. A damp appliance can leave moisture inside its packaging, while a connected cable can catch or pull during handling. Professional moving support can help coordinate this preparation with the wider move.
They are not necessarily cheaper, as the cost depends on the job and is provided after a quote request. Their careful preparation can reduce handling risks, including those from trapped moisture, spills and cables catching or pulling.
How Professionals Wrap Appliances and Sharp Components
For ovens, washing machines and dishwashers, wrap each appliance individually and secure doors or covers that could open during handling. Protect sharp or detachable parts separately, and contain them so they cannot move around or damage other belongings.
Wrap each appliance on its own. Use suitable packing paper or bubble wrap to protect each kitchen appliance, rather than grouping several together. Separate wrapping helps prevent surfaces rubbing against other items and makes each appliance easier to handle.
Use protective layers suited to the appliance. Small appliances should receive two to three layers of protective material. For a particularly fragile appliance, add a layer or two of bubble wrap. Keep the wrap secure around the appliance, including corners and edges that could be exposed during handling.
Secure doors and covers that might swing open. Close movable doors or covers before wrapping an appliance. If a door could open during handling, secure it so it stays shut and does not catch on nearby items. Avoid leaving lids or covers loose.
Protect blades before packing them separately. Wrap sharp blades carefully in paper, then place them in a secure container where they cannot move. This keeps cutting edges contained and helps prevent damage to appliance wrapping or injuries during handling.
Check the wrap before the appliance is boxed. Look for exposed edges, loose paper and areas where cushioning has slipped. Reposition protective material so it stays between the appliance and anything that could rub against it. For large appliances, keep doors secured and wrap the outer surfaces individually before placing them for transport.
How Professionals Secure Cords and Moving Parts
Identify every loose part before wrapping. Check for removable components and accessories, such as trays or blender attachments. Keep each piece with its appliance to avoid misplacing it or mixing it up with parts from another item. This check also helps identify anything that needs separate protection.
Group small accessories in a resealable bag. Put each appliance’s detachable parts and small accessories together, rather than leaving them loose in the box. Label the bag and keep it with the matching appliance so everything is easy to find when unpacking. This is a practical part of the best way to pack kitchen appliances, especially when attachments look alike.
Coil each power cord neatly. Gather the cord into a controlled coil beside the appliance. Secure it with a twist tie, rubber band or tape so it cannot trail during handling. Keep the plug with the coil instead of letting it hang loose and catch on packing materials or another item in the load.
Keep cords clear of moving parts. Position each coil away from hinges, blades and removable components. For example, secure a kettle’s cable alongside its body rather than across the lid. The best way to pack kitchen appliances includes checking that cords and loose parts cannot snag or shift during handling.
Photograph appliances before disassembly. If a component needs to be removed, take photos as you take it apart. The images can show how the pieces fit together and help with reassembly after transport. Keep the photos with the appliance’s instructions or accessories so they are easy to find.
Check each appliance as a complete unit. Before boxing, confirm that the cord is secured and accessories are together in a labelled bag. Nothing should dangle or move freely. This final check helps keep the appliance and its small parts organised through loading and unpacking.
For a move where appliance cords and components need careful handling, arrange your move with Let's Move London.
Let's Move London
Let's Move London can help coordinate your wider move when kitchen appliances need careful preparation and transport. Its moving services support residential relocations, while secure storage can help when your new home is not ready for all your belongings. The right arrangement depends on your move and what you need to transport or store.
Turn to Let's Move London for help planning your household move, including how your appliances fit into the arrangements. Share clear details about the items and your moving plans to help shape a practical approach. Insurance is included with every move.
Contact Let's Move London to discuss your move.
Make Your Move Easier to Manage
Prepare the destination before moving day so appliances and accessories have a clear place when they arrive. Keep instructions and other useful details together, especially for items with removable components. This simple step can make unpacking more organised and help you settle into your kitchen.
The best way to pack kitchen appliances is one part of a successful move. The wider plan matters too, especially if you need help moving household belongings or storing them before you can unpack. Lets Move London offers moving, storage and man and van services for different moving needs across London.
Choose the arrangement that suits your move, then take the next step with a clear plan. Contact Let's Move London to discuss your move and move forward with confidence.
Frequently Asked Questions
When Should You Arrange for Your Kitchen to Be Packed?
Plan the packing schedule around the kitchen items you will need before departure. Pack appliances you do not use regularly ahead of moving day, while keeping everyday equipment accessible for meals. Leave the kettle and breakfast items available if you will use them on the morning of the move. This avoids opening sealed boxes to retrieve something you still need.
How do professional movers prepare kitchen appliances for packing and moving?
Professional movers prepare appliances according to their condition, detachable parts and manufacturer instructions. The best way to pack kitchen appliances is to match the preparation to each item, rather than treat a blender like a fridge. If an appliance needs dismantling, photos can show how its components fit together. Tell the packing team which items you will need soon after arrival so they can be kept easy to identify.
What packing materials do professionals use for kitchen appliances?
Choose protective materials according to each appliance’s size, shape and fragility. Packing paper or bubble wrap can protect surfaces, while a well-fitting box supports the item. Original packaging can provide a useful fit for a particular model. A compact coffee machine and a larger food processor, for example, may need different box sizes and cushioning to prevent movement.
How do professional movers pack small kitchen appliances such as kettles, toasters and blenders?
Prepare small appliances individually and keep removable parts with the correct item. Group a toaster’s crumb tray or a blender’s attachments so they are easier to identify at your new home. Empty kettles before packing. Remove batteries from small appliances and store them separately, keeping the items organised for unpacking.
How do professional movers protect appliance cords, hoses and removable parts during a move?
Secure cords so they cannot trail or catch on other items, and keep removable parts with the appliance they belong to. For a kettle, secure the cable alongside the body; for a blender, group its attachments together. Keep any hose with its appliance and position it to avoid snagging. Clear labelling makes each item easier to identify after transport.

Comments